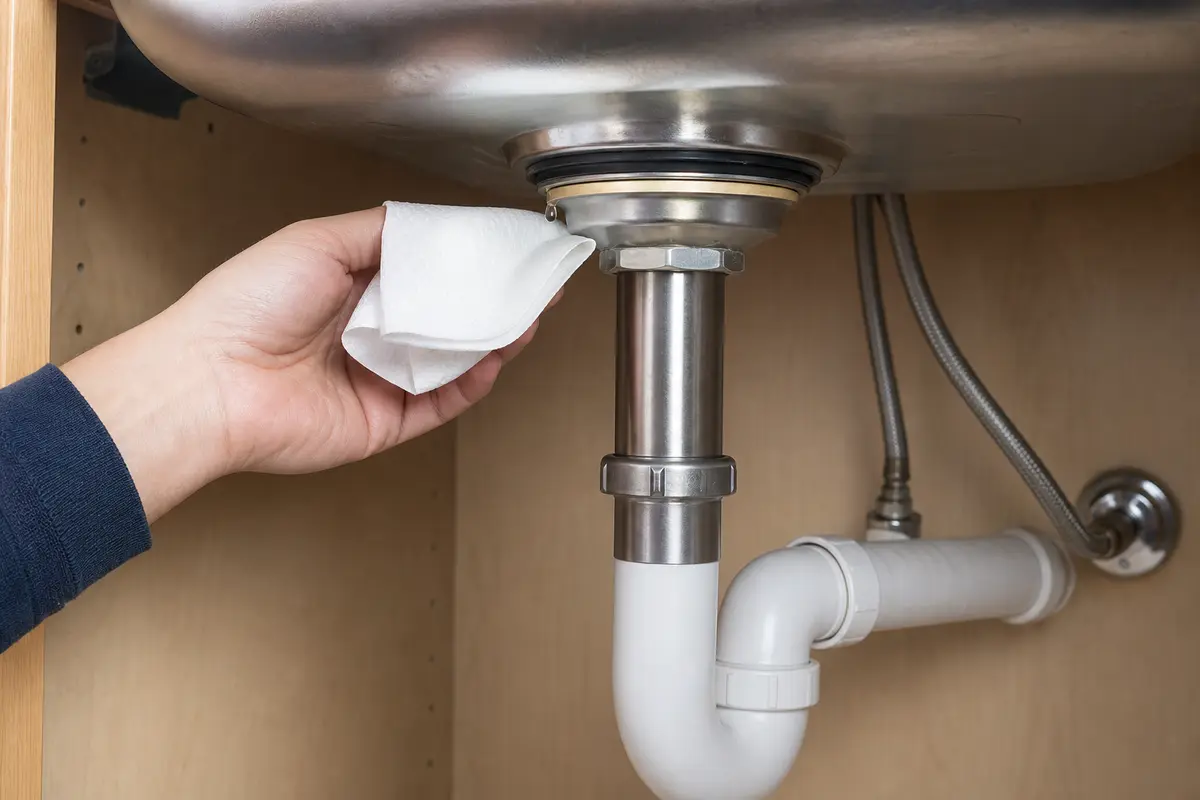
Replace the basket strainer when the first fresh drop appears where its body meets the underside of the sink, or when the flange is loose, pitted, or rusted through. Dry every joint; test while the sink holds water, then as it drains. A drip at the tailpiece nut, P-trap, faucet, or disposal needs a different repair.
The seal has to work in two places: the top flange must bed evenly against the sink, and the gasket stack below must clamp without twisting. Keep the old pieces in order, match the new kit before applying sealant, and do not try to cure a crooked flange by tightening harder.
Before you start: Put a shallow pan and towels under the drain, then photograph the old strainer, gasket stack, and tailpiece connection. Check the sink material and the instructions for both the sink and replacement strainer before choosing plumber's putty or silicone. Regular putty can stain porous surfaces, and it is not compatible with every plastic part.
Find the first wet joint before you replace the strainer
Dry the flange, strainer body, tailpiece nut, trap, disposal connection, and supply lines. Test while the sink holds water. Test again as it drains. The first drop separates a flange leak from a lower drain leak.
Water starts at the strainer body
Look for: A bead forms where the threaded strainer body passes through the sink. The top flange may also shift, spin, pit, or show failed sealant.
Next step: A basket-strainer replacement fits this symptom. Inspect the opening after removal. The new flange still needs a flat, sound surface.
Water starts below the strainer
Look for: The flange stays dry. Water appears at the tailpiece coupling, a slip-joint washer, the P-trap, or a branch connection only as the sink drains.
Next step: Repair that lower joint instead. A new basket strainer will not seal a crooked tailpiece or a worn trap washer.
The sink uses a disposal or unusual drain
Look for: A disposal hangs from the flange. The old drain may instead have a proprietary shape, overflow path, unusual outlet, or gasket-only design.
Next step: Use the manufacturer's matched parts and instructions. Do not substitute a standard basket strainer because the opening looks close.
Separate a flange leak from a tailpiece leak
Hold water in the sink before you release it. Watch the strainer joint first. If it becomes wet while the lower drain stays dry, the flange or gasket stack is leaking. Lay out every new piece before it disappears under the sink.
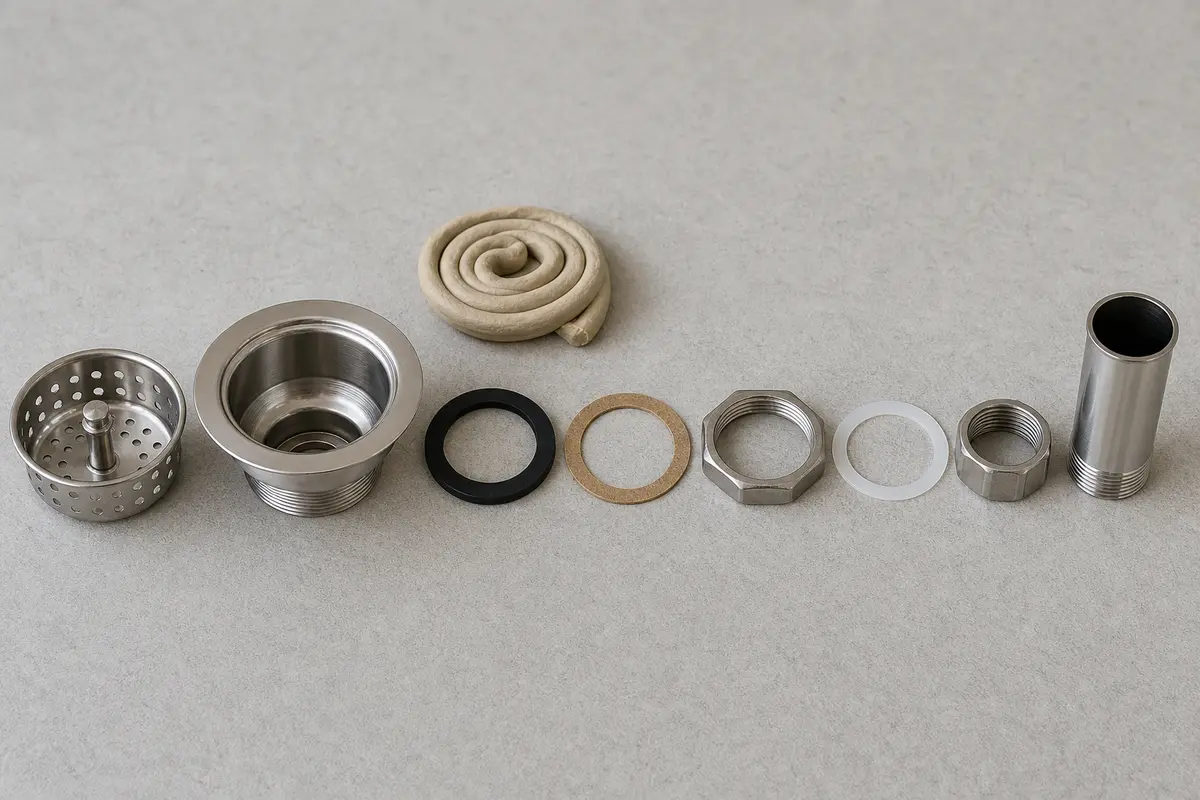
Dry every joint first. A bead at the strainer body while the sink holds water points to the flange seal. A lower joint that wets only during draining needs a different repair.Keep the old stack for comparison. On a common metal strainer, the rubber gasket touches the sink. The fiber washer goes between the rubber and locknut. Follow the new kit's order if it differs.
Safety first
Do not run the faucet while the tailpiece is disconnected. Put a pan below the work and keep cabinet contents away from the open drain.
Wear gloves around rusted sheet metal and cut threads. Old strainers and thin locknuts can leave sharp edges.
Support the tailpiece, trap, and wall arm while loosening a nut. Stop if a fitting in the wall or a garbage-disposal mount begins to turn.
Use sealant only where the sink and strainer instructions call for it. Plumber's putty does not belong on pipe threads or inside a pressurized connection.
Do not grind or cut a seized locknut in a cramped cabinet unless you can protect the sink, nearby hoses, wiring, and your hands. Call a plumber when the tool cannot be controlled safely.
Tools you may need
Channel lock pliers — To steady the tailpiece and loosen slip nuts without twisting the rest of the drain out of alignment.
Basket strainer wrench or large slip joint pliers — To engage a lugged strainer locknut where ordinary pliers cannot grip squarely in the tight cabinet space.
Putty knife or plastic scraper — To lift old putty and residue without gouging the sink surface around the drain opening.
Bucket or shallow pan — To catch the water left in the tailpiece and trap when the drain connection comes apart.
Rags or paper towels — To dry each joint and make the first fresh drop easy to see during diagnosis and final testing.
Plumber's putty — Use it when the sink and strainer instructions both approve putty. Skip it when either one calls for silicone.
Step-by-step fix
Step 1: Prove the leak starts at the basket strainer
Empty the cabinet and wipe the strainer body, tailpiece nut, trap, disposal connection if present, faucet hoses, and shutoff valves completely dry.
Set a dry paper towel directly below the strainer body, then put the basket or stopper in place and hold a shallow basin of water in the sink without draining it yet.
Watch the underside of the sink. A drop forming where the strainer body passes through the sink points to the flange seal or gasket stack.
Release the water and watch the tailpiece and trap. A lower joint that becomes wet only during draining is a separate leak.
Repeat the test once if water has traveled along a pipe and made the starting point unclear. Drying between tests matters more than adding more water.
If it works: The first fresh drop forms at the basket-strainer-to-sink joint, or the flange is visibly loose, pitted, or rusted through.
If it doesn’t: If the strainer stays dry, follow the first wet joint. Tighten or rebuild the leaking tailpiece or slip joint, or trace a faucet, supply-line, disposal, or dishwasher-hose leak instead.
Stop if:
Water is coming through a cracked, deeply pitted, bent, or rusted-through sink surface around the drain opening.
The disposal, drain arm, or piping inside the wall moves when you touch a nearby nut.
Step 2: Match the new strainer before taking the drain apart
Photograph the drain from above and below, including the order of the rubber gasket, fiber friction washer, locknut, tailpiece washer, coupling nut, and tailpiece.
Check the sink fit first: compare the replacement flange with the opening, then check that its threaded body can pass through the sink while leaving room for the full gasket stack below.
Check the drain fit next: compare the outlet and tailpiece connection, removable basket or stopper, included washers, locknut style, and every instruction packed with the new part.
Read the sink and strainer instructions for the approved bedding material. Use stain-free putty or the specified silicone where ordinary plumber's putty is not allowed.
Lay the new parts out in installation order. Keep the old assembly intact and the sealant closed until every fit check passes.
If it works: The replacement fits the opening and tailpiece, its parts are complete, and you know which sealing material and gasket order its manufacturer specifies.
If it doesn’t: Return or exchange the kit before opening sealant. A close-looking flange does not make up for the wrong body length, outlet, stopper style, or gasket stack.
Stop if:
The replacement instructions conflict with the sink manufacturer's sealant or material guidance.
The sink uses a garbage-disposal mounting flange or a proprietary drain that the new basket strainer is not designed to replace.
Step 3: Disconnect the tailpiece without twisting the drain
Do not run the faucet while the drain is apart. Put the pan under the 1-1/2-inch tailpiece and P-trap, then loosen the tailpiece coupling nut.
Hold the metal or plastic tube with your free hand. Turning the nut should not push the trap or wall arm sideways.
Lower the tailpiece straight down until it clears the strainer outlet. Loosen the next slip joint only if you need more travel.
Remove the flat tailpiece washer and set it beside the coupling nut. Check that an old washer is not hidden inside the nut or stuck to the outlet.
Inspect the tube end, washer, nut threads, and strainer outlet. Cracks, a flattened washer, crossed threads, or deep corrosion will leak after reassembly.
If it works: The tailpiece is clear of the strainer, the drain remains supported and aligned, and the lower fittings are reusable or have matching replacements ready.
If it doesn’t: If the tailpiece cannot move straight down, loosen the next slip joint and realign the pieces gently. Do not lever the pipe sideways against the wall connection.
Stop if:
A corroded metal tube splits, a plastic nut cracks, or the wall arm turns with the fitting.
The drain cannot move enough to clear the strainer without forcing a disposal, dishwasher branch, or fixed pipe.
Step 4: Remove the locknut and clean the sink opening
Use the basket-strainer wrench on the large locknut below the sink. Keep the tool square to the nut so it does not slip off a lug or deform a thin locknut.
If the strainer spins, have a helper hold it from above with a basket-strainer holding tool or padded pliers while you turn the locknut below.
Slide off the locknut, fiber friction washer, and rubber gasket in order, then push the old strainer body up through the sink opening.
Lift away the old sealant with a plastic scraper. Clean the top and underside of the opening until no putty, silicone, grease, grit, or hard ridge can hold the flange crooked.
Dry the opening and inspect it in bright light for a bent rim, cracks, deep pitting, delamination, or a surface that will not support an even seal.
If it works: The old assembly is out and both faces of a sound sink opening are clean, smooth, and dry.
If it doesn’t: If the locknut will not turn with a strainer wrench, do not reach for a cutting wheel in a crowded cabinet. It can nick the sink, tailpiece, supply hoses, or disposal wiring. Call a plumber if you cannot shield those parts and control the tool.
Stop if:
The sink flexes, cracks, flakes, or bends while the locknut is being removed.
Corrosion has joined the locknut and body so tightly that the required cutting or grinding cannot be done safely in the cabinet.
Step 5: Bed the flange and rebuild the gasket stack
Follow the replacement instructions if their order differs. A common metal assembly places compatible sealant beneath the top flange, then the rubber gasket against the underside of the sink, the fiber friction washer, and the locknut.
For a putty-approved installation, knead fresh putty and roll one continuous rope. Join its ends and press it around the underside of the flange without smearing it onto the threads.
Press the strainer into the opening from above. Keep the flange centered while a helper prevents it from rotating.
From below, seat the rubber gasket flat against the sink, add the fiber washer so the locknut can turn without dragging the rubber, then start the locknut by hand.
Watch both sides as you tighten the locknut evenly. The flange should stay level while excess bedding material squeezes out around its edge, and the rubber gasket below should stay flat. Stop before the sink, gasket, or locknut distorts, then remove the excess sealant as directed.
If it works: The flange sits flat and centered, the gasket and friction washer are not folded or squeezed out, and the body does not spin under light hand pressure.
If it doesn’t: If the flange tips, spins, or squeezes material out on only one side, take it back apart. Clean off the used bedding material and reset it with fresh material rather than tightening a crooked assembly.
Stop if:
The locknut will not start easily by hand or the replacement body is too short for the sink and gasket stack.
The sink or strainer instructions do not identify a sealant compatible with both materials.
Step 6: Reconnect the tailpiece and test both seals
Fit the correct tailpiece washer into the coupling nut, align the tailpiece without side pressure, and thread the nut onto the strainer body by hand before using a tool.
Reconnect any slip joint loosened for clearance. Seat each beveled washer in the direction required by that fitting and keep the tubes straight while tightening.
Wipe every joint dry, use the stopper or a suitable drain plug, and hold water in the sink while you inspect the underside of the strainer flange with a clean paper towel.
Release the water and watch the tailpiece and trap under full drain flow. Dry the joints, wait a few minutes, and check once more for a slow bead.
If the flange leaks, remove and reset it with fresh bedding material. If only a lower joint leaks, reseat that washer or alignment instead of tightening the strainer locknut harder.
If it works: The flange stays dry while the sink holds water, every lower joint stays dry while it drains, and the strainer remains flat and still.
If it doesn’t: Trace the first wet point. A flange leak needs a clean reset. A tailpiece or trap leak needs the correct washer, straight alignment, and snug coupling nut.
Stop if:
The sink leaks again after a clean reset with a verified matching part and compatible sealant.
A coupling will not thread by hand, a pipe must be forced sideways to meet, or tightening begins to crack or deform a fitting.
Verify the repair
The top flange sits flat and centered with no gap, rocking, or rotation.
The underside of the strainer remains dry while the plugged sink holds water.
The tailpiece, coupling nut, slip joints, and trap stay dry while a basin of water drains.
The gasket and friction washer remain flat, and no rubber is folded or bulging past the locknut.
A clean paper towel pressed to each joint stays dry during a second check several minutes after the main test.
FAQ
Should I use plumber's putty or silicone under a kitchen sink strainer?
Check both product instructions. Regular putty suits many metal strainers in stainless steel. Granite, marble, quartz, ABS, and acrylic may require stain-free putty or silicone.
Which way do the rubber gasket and fiber washer go?
On a common metal assembly, press the rubber gasket flat against the underside of the sink. Set the thin fiber washer below the rubber, then install the locknut. The fiber layer lets the nut turn without dragging the gasket. If the parts diagram shows a different order, use that order.
Why does my new basket strainer still leak?
Dry the drain and find the first drop. Water at the underside of the flange usually means the opening was not fully clean and dry, the flange tilted, the sealant was wrong or uneven, or the gasket twisted. Water lower down points to the tailpiece washer, alignment, or another slip joint.
How do I know a replacement basket strainer will fit?
Compare the old and new flange width, threaded body diameter and length, sink thickness allowance, outlet and tailpiece connection, basket or stopper style, gasket stack, and locknut. Do not rely on the top flange diameter alone.
Can I reuse the old rubber gasket or plumber's putty?
Use the new gasket and washers supplied for the replacement. Apply fresh compatible putty or sealant whenever the flange is removed or reset; old bedding material may be contaminated, flattened, or unable to form a continuous seal.
Do I have to remove the P-trap to replace a basket strainer?
Not always. If the tailpiece can drop straight down after its coupling nut is removed, the trap may stay in place. Loosen or remove more of the drain only when you need clearance, and support the wall arm so the extra movement does not open another leak.
Sources and reference notes
Basket-strainer designs vary. The parts sheet controls the gasket order, bedding material, and tightening method. The sources below show a common metal assembly and explain when putty belongs under the flange. If the sink or strainer instructions call for silicone, use silicone instead.
Kohler sink strainer installation guide - Official installation example showing sealant beneath the strainer rim, the rubber and paper gasket stack, the locknut, and a separately sealed tailpiece connection.
Oatey plumber's putty application guidance - Manufacturer guidance for cleaning and drying the surface, making a continuous putty rope, avoiding overtightening, testing immediately, and checking material compatibility.
Kohler K-8814 sink strainer specifications - Official example showing that outlet size, sink-opening range, and maximum sink thickness are fit checks separate from the visible top flange.