Pressure washer repair

How to Replace a Pressure Washer Thermal Relief Valve

A brief release of hot water can be the valve doing its job. Suspect a bad valve when it drips while the pump is cool or stays open after the machine has been shut down and allowed to cool.

Turn the engine off, shut off the water, squeeze the trigger until pressure is gone, and let the pump cool. Make sure the leak really starts at the small relief valve—not a hose fitting or a crack in the pump—before buying a replacement.

Before you start: Use the pump model number to find the correct valve. The threads, seal, and opening temperature must match. Do not remove a hot or pressurized fitting, and never plug or bypass the valve.

Prepared by: Repair Riot Last updated: 2026-07-11 How we build and check guides

Make sure the valve is actually leaking

Dry the pump and watch where fresh water appears. A leak at a hose, unloader, or cracked pump housing needs a different repair.

Likely a bad relief valve

Look for: Water comes from the valve while the pump is cool, or the valve opens hot and does not close again after shutdown.

Choose another repair if: Write down the pump model and compare the old valve with the replacement.

Probably normal protection

Look for: The pump releases a little hot water only after the engine has been running with the trigger released.

Choose another repair if: Shut the machine down and let it cool. Avoid long periods with the trigger released, following the washer manual.

Not a valve repair

Look for: Water comes from a cracked pump body, loose hose fitting, or another component beside the valve.

Choose another repair if: Do not disturb the relief valve. Repair the actual leak or have the pump serviced.

Make sure the leak is coming from this valve

Dry the pump and watch where fresh water appears. Before ordering a valve, compare the old part with the replacement and make sure the pump threads are not cracked or damaged.
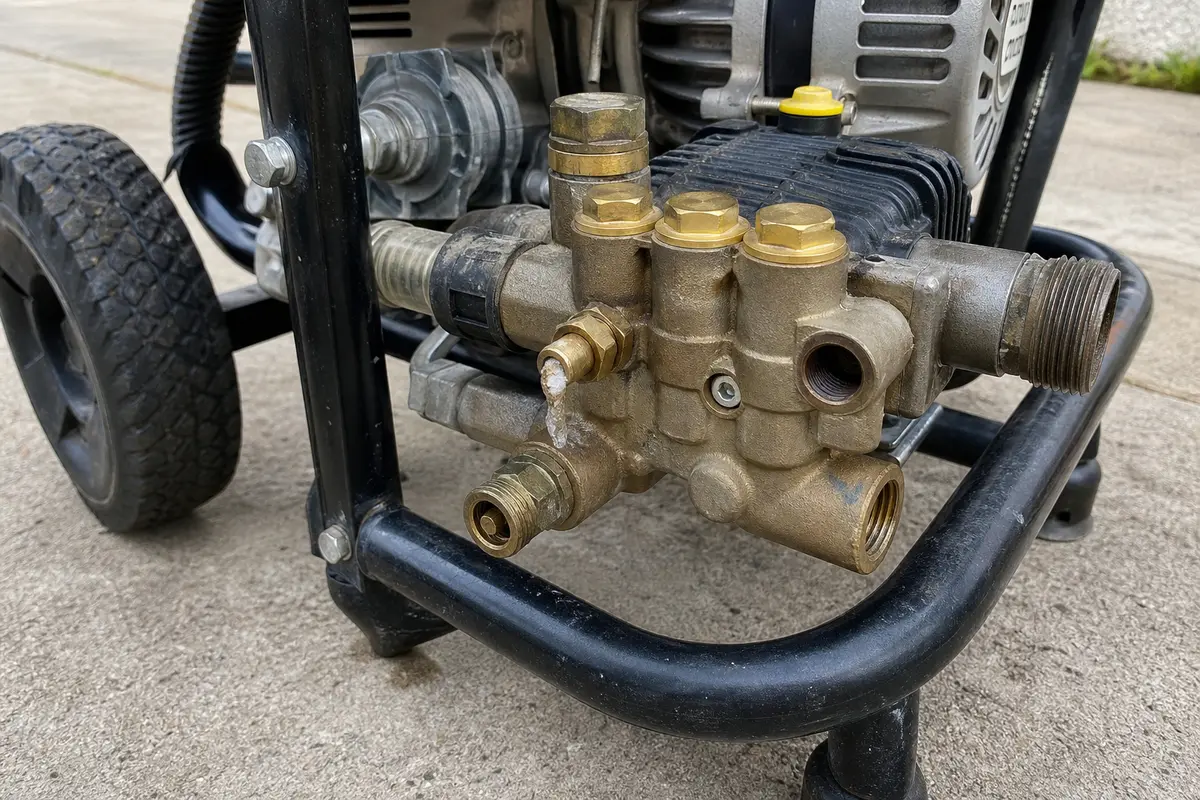
Pressure washer pump showing the small thermal relief valve where water may leak
Confirm that water starts at the relief-valve outlet or threads. A cracked pump body or nearby fitting needs a different repair.
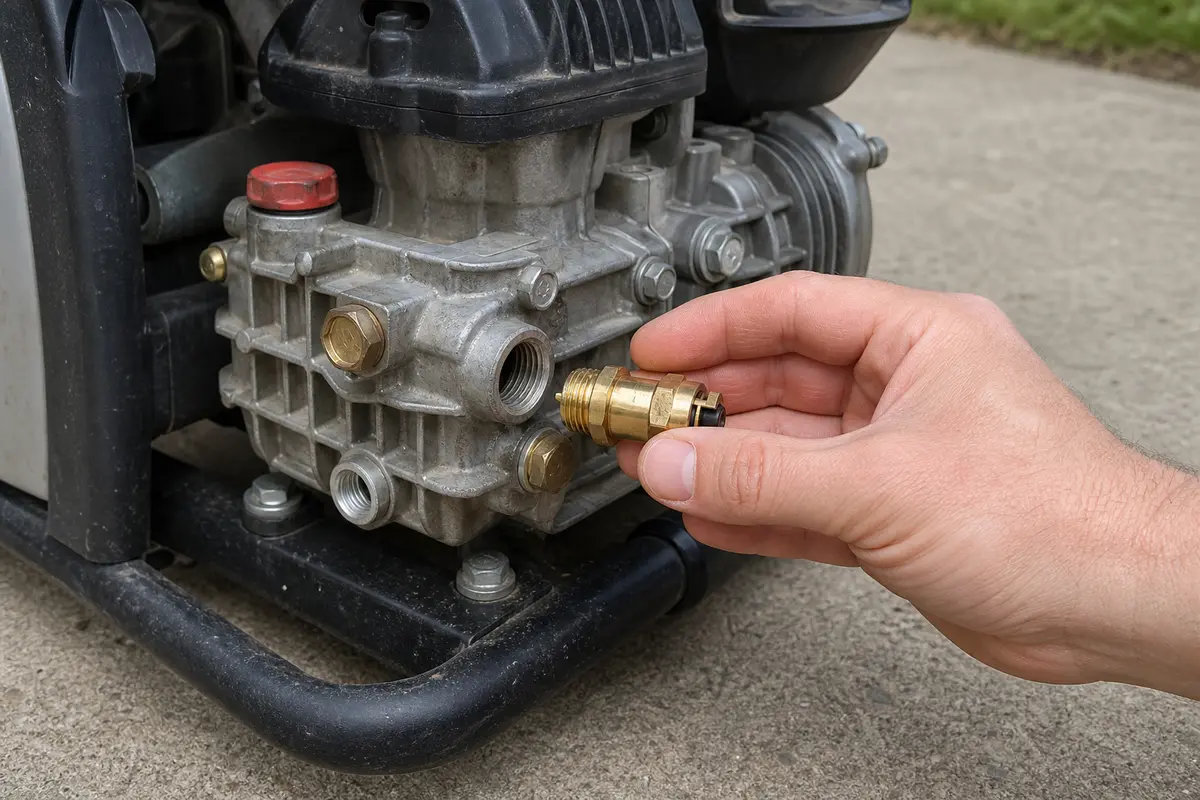
New pressure washer thermal relief valve compared with the old valve before installation
Start the model-matched valve by hand. Stop if its threads, shoulder, seal, or temperature rating differ from the original.

Safety first

  • Relieve all trapped pressure before loosening the old valve.
  • Let the pump cool before touching the thermal relief valve area.
  • Keep hands clear of any pressurized spray or leaking connection during testing.
  • Never plug or bypass a thermal relief valve. Do not overtighten it into the pump body.

Tools you may need

Adjustable wrench sized to the flats of a pressure washer relief valve

Adjustable wrench

Use it for: To loosen and tighten the old and new valve without rounding the flats.

Shop adjustable wrenches
Thread seal tape or thread sealant rated for water fittings tool

Thread seal tape or thread sealant rated for water fittings

Use it for: To help seal the new valve threads if your valve uses tapered threaded connections.

Shop thread seal tape
Clean absorbent cleaning cloth for drying the pressure washer pump before a leak check

Clean rag

Use it for: To wipe the pump area clean so you can spot the exact leak and clean the threads before installation.

Shop shop rags
Small brush or old toothbrush tool

Small brush or old toothbrush

Use it for: To clean debris from the threaded port before installing the new valve.

Shop small cleaning brushes

As an Amazon Associate I earn from qualifying purchases. Repair Riot may earn a commission at no extra cost to you.

Step-by-step fix

Step 1: Confirm the thermal relief valve is the problem

  1. Set the pressure washer on a flat surface and make sure the engine or motor is off.
  2. Let the pump cool if it was just running. The thermal relief valve opens when pump water overheats, so a hot machine can mislead your diagnosis.
  3. Wipe the pump and valve area dry with a rag.
  4. Turn the water supply on briefly without running the pressure washer, or run the machine only long enough to identify the leak if needed.
  5. Watch for water leaking directly from the thermal relief valve body or outlet instead of from a nearby hose, fitting, or cracked pump housing.
  6. Watch when the water appears. A short hot-water release after the washer sits with the trigger released may be normal. A valve that drips while cool or stays open after shutdown is more likely to be bad.
  7. On a belt-drive washer, trace the pump carefully instead of assuming the valve sits where it does on a direct-drive homeowner unit.

If it works: Fresh water appears at the relief valve itself, not at a nearby hose fitting or crack in the pump.

If it doesn’t: If the water is coming from a hose connection, unloader area, or a crack in the pump body, fix that issue instead before replacing the valve.

Stop if:
  • The pump housing is cracked.
  • A fitting next to the valve is broken or cross-threaded.
  • The leak source is not clear enough to identify safely.

Step 2: Shut the machine down and relieve all pressure

  1. Turn off the engine or unplug the electric pressure washer.
  2. Turn off the water supply.
  3. Squeeze the spray gun trigger until water flow stops and the system no longer feels pressurized.
  4. Disconnect the spark plug wire on a gas unit if it is easy to reach, or keep the machine unplugged on an electric unit.
  5. Wait a few more minutes if the pump or valve still feels hot to the touch.

If it works: The pressure washer is cool, off, and no longer holding water pressure.

If it doesn’t: If the trigger still releases pressure, keep bleeding it off before loosening any pump fitting.

Stop if:
  • The spray gun will not relieve pressure at all and the system appears blocked.
  • The pump or valve area is still too hot to handle safely.

Step 3: Remove the old thermal relief valve

  1. Locate the thermal relief valve on the pump body and photograph how it is installed, including the shoulder, visible thread length, and sealing method.
  2. Place a rag under the area to catch any remaining water.
  3. Use an adjustable wrench to turn the old valve counterclockwise and remove it.
  4. If the valve is stubborn, apply steady pressure instead of jerking the wrench so you do not damage the pump threads.
  5. Inspect the removed valve and the pump port for damaged threads, mineral buildup, or debris.

If it works: The old valve is out and the pump port is accessible for cleaning.

If it doesn’t: If the valve will not loosen, apply penetrating time by letting the area sit dry and try again carefully with better wrench support.

Stop if:
  • The pump threads start to deform or chip.
  • The valve breaks off in the pump body.
  • The port is badly corroded or cracked.

Step 4: Clean the port and prepare the new valve

  1. Use a rag and small brush to clean the threaded port so the new valve can seat properly.
  2. Remove any old thread seal tape or sealant from the pump threads and the surrounding area.
  3. Compare the new pressure washer thermal relief valve to the old one for thread diameter, pitch, threaded length, shoulder, temperature rating, and connection style.
  4. Apply thread seal tape or sealant only if the replacement valve uses threaded sealing at the threads. Keep sealant away from the valve opening itself.

If it works: The port is clean and the new valve matches the old one closely enough to install.

If it doesn’t: If the new valve does not match the old one, pause and get the correct replacement before forcing the fit.

Stop if:
  • The replacement valve has different threads or will not start by hand.
  • The pump port threads are too damaged to hold a new valve securely.

Step 5: Install and snug the new valve

  1. Start the new valve by hand to avoid cross-threading.
  2. Turn it in by hand until it seats evenly, then use the wrench to snug it further.
  3. Do not overtighten. Tighten only enough to seal and hold the valve securely in the pump body.
  4. Wipe the area dry again so any fresh leak will be easy to spot during testing.

If it works: The new valve is installed straight, snug, and the area is clean for testing.

If it doesn’t: If the valve will not thread in smoothly by hand, remove it and realign it before trying again.

Stop if:
  • The valve binds after only a partial turn by hand.
  • The pump body threads strip or the valve sits crooked.

Step 6: Test the repair under real use

  1. Reconnect power or the spark plug wire if you disconnected it.
  2. Turn the water supply on and check the valve area for leaks before starting the machine.
  3. Start the pressure washer and use it normally for several minutes so the pump sees real operating conditions.
  4. Release the trigger and avoid leaving the machine in bypass for long periods, since that is what heats the pump water.
  5. Shut the machine off and inspect the valve area again for drips, seepage, or movement.

If it works: The valve stays dry during operation and after shutdown, and the connection remains secure.

If it doesn’t: If the new valve still leaks, remove it and recheck thread condition, sealant use, and part fit. If those look correct, the pump may have a related sealing or overheating issue.

Stop if:
  • Water is leaking from the pump body instead of the valve.
  • The new valve opens repeatedly during normal short use, suggesting another pump or unloader problem.
  • The connection sprays water under pressure.

Replacement Parts

As an Amazon Associate I earn from qualifying purchases. Repair Riot may earn a commission at no extra cost to you.

Verify the repair

  • The valve threads in by hand and sits straight in the pump body.
  • No water seeps from the valve threads with the water supply turned on.
  • The pressure washer runs and sprays normally without leaking at the valve.
  • After a short real-use test, the valve area remains dry and secure.

FAQ

What does a pressure washer thermal relief valve do?

It helps protect the pump from overheating by releasing hot water when the pump sits in bypass too long. If it sticks, leaks, or fails to reseal, it can drip or spray water even when the rest of the pump is fine.

How do I know the valve is bad instead of doing its job?

A normal valve may release hot water after the washer sits running with the trigger released. A failed valve is more likely to drip while the pump is cool, leak constantly, or stay open after the pump cools.

Is a belt-drive pressure washer valve replaced the same way?

The basic safety and replacement sequence is similar, but valve location, thread, and sealing style can differ. Match the pump model and the removed valve rather than relying only on the pressure-washer brand.

Do I need thread seal tape on the new valve?

Only when the exact pump or replacement instructions call for it. Some valves seal on tapered threads; others use a shoulder, washer, or O-ring. Do not add tape or sealant to an opening or sealing surface that was not designed for it.

Can I keep using the pressure washer with a leaking thermal relief valve?

It is better to replace it. A leaking valve wastes water, can make a mess around the pump, and may point to overheating that can damage the pump if ignored.

What if the new valve still leaks after replacement?

First check that the threads are clean, the valve is the correct match, and the sealant was used correctly if needed. If it still leaks, the pump port may be damaged or the pump may have another overheating or sealing problem.

Official references and diagnostic help

Thermal relief can be normal pump protection during bypass. Confirm the operating condition and let the pump cool before deciding that the valve has failed.