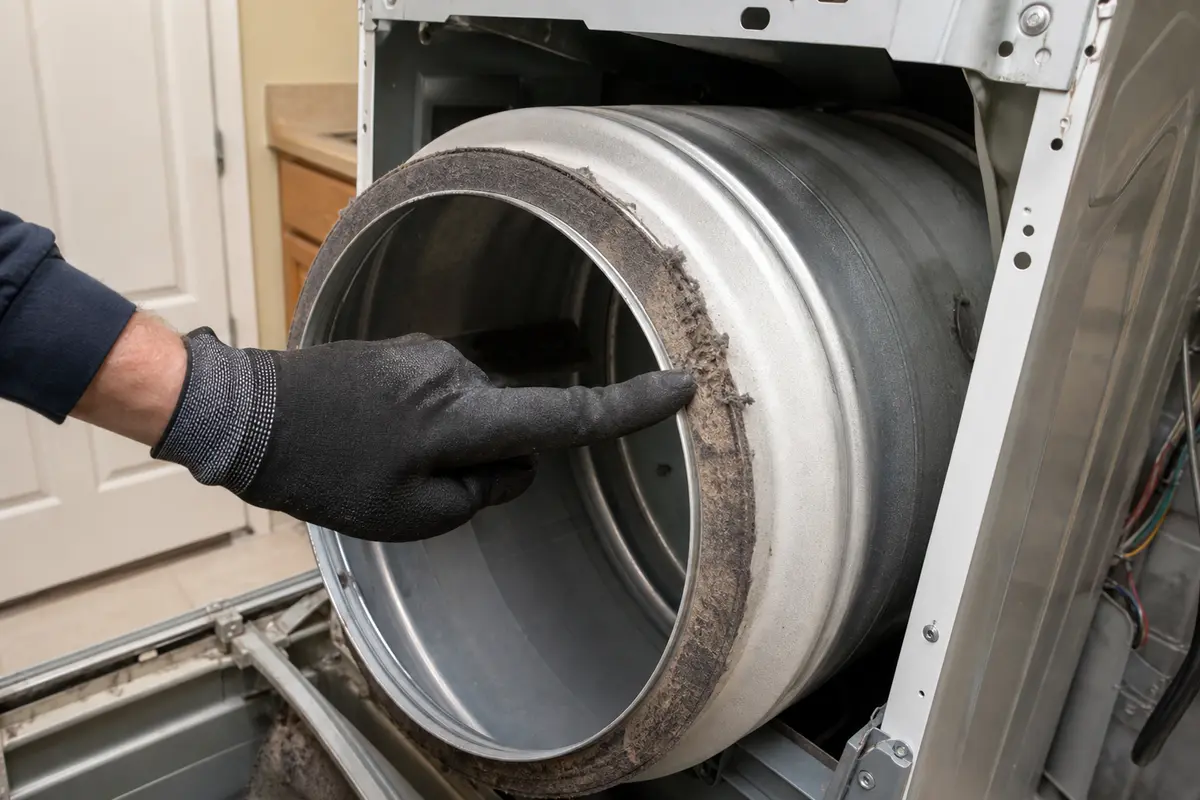
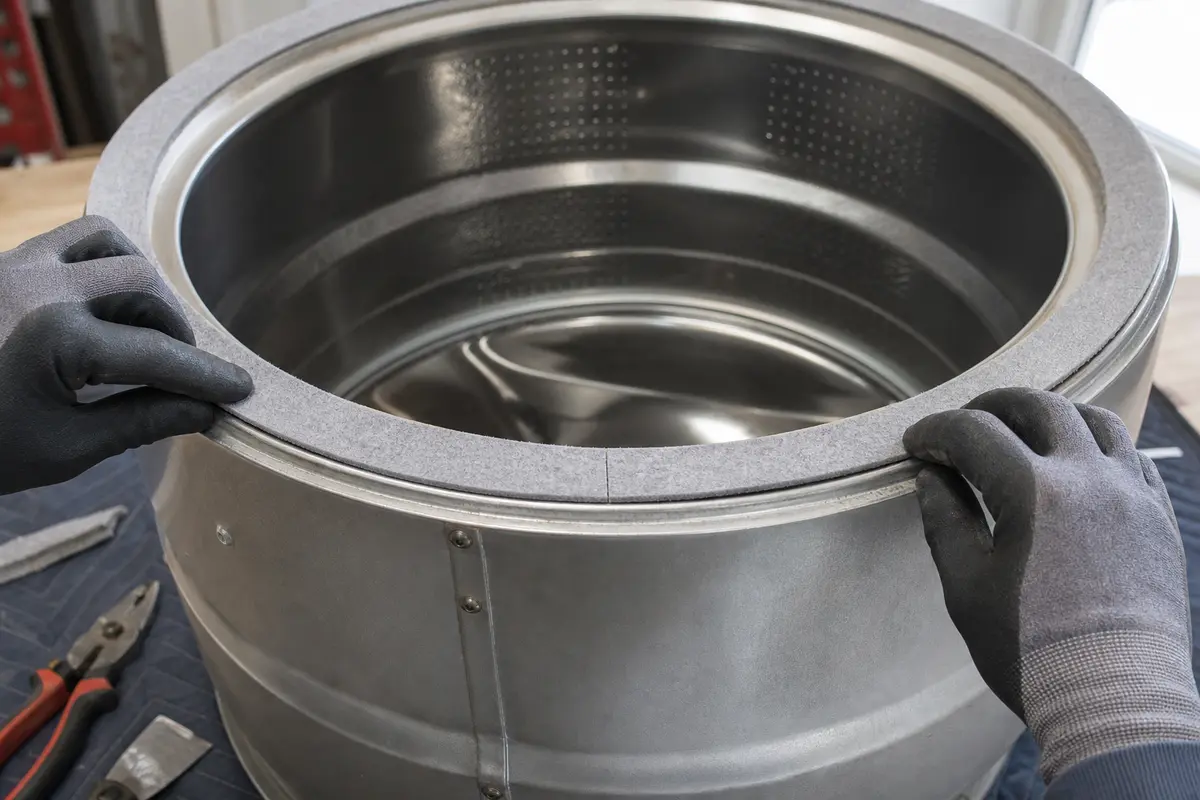
Unplug the dryer, open the door, and inspect the drum edge with a flashlight. Frayed felt, black dust, shiny rub marks, or clothes caught in the gap point to a worn seal. Find out whether the damage is at the front or rear before ordering anything.
Use the instructions for your exact model, because cabinet access, seal position, adhesive, and drying time vary. Lay the new seal in place before adding glue; it should sit flat without stretching or twisting. If the felt looks intact, check the rollers, glides, idler, or blower instead.
Before you start: Find the full dryer model number and confirm whether the front or rear seal is damaged. Take photos as the cabinet comes apart, especially the belt path and wire plugs. Buy the seal and adhesive listed for that model rather than choosing by brand or appearance.
A scraping sound does not automatically mean the felt is bad. Look for torn or flattened felt and rub marks at the drum edge. If the felt looks healthy, the noise may be coming from a roller, glide, belt, idler, or blower wheel instead.
The seal is visibly worn
Look for: The felt is frayed, missing, scorched, detached, flattened, or letting clothing catch at the front or rear drum gap. Use a light at the door opening, then check the rear edge once the cabinet is open. A shiny rub line on the drum flange or dark felt dust in the channel points to seal wear.
Next step: If the felt looks intact but the dryer thumps, squeals, or rumbles from below the drum, inspect drum rollers, glides, belt, idler, and blower parts before ordering a seal.
The drum lip is still usable
Look for: The drum lip and bulkhead are round, smooth, and solid enough for the new felt to sit flush. Run a fingertip around the channel after the old seal is out; minor old glue is fixable, but a sharp metal ridge is not.
Next step: If the metal is bent, cracked, deeply grooved, or worn through, replacing felt alone will not keep the drum centered.
You can document the belt path
Look for: You can photograph the belt routing, drum orientation, door switch wires, harness clips, and screw groups before the drum comes out.
Next step: If the cabinet design is unfamiliar, stop at each layer and take photos. Most felt seal mistakes show up during reassembly.
The seal matches the exact dryer model
Look for: The seal is listed for your full dryer model and the same front or rear drum position. The felt thickness, profile, glide strip, seam, and adhesive method match the old seal.
Next step: Do not buy by brand name or product photo alone. Samsung, Haier, Whirlpool, GE, LG, and other dryers vary by model series.
Find the failed seal before you order parts
A worn seal often leaves frayed felt, black dust, rub marks, clothing caught in the gap, or scraping as the drum turns. Find out whether the front or rear seal is damaged, then lay the new felt in place without glue to check the fit.
Frayed felt, black dust, shiny rub marks, or clothing caught at the drum edge point to a worn seal. If the felt looks good, check the rollers, glides, idler, and blower instead.Lay the felt in place before adding adhesive. The seam should sit flat, with no twists, stretched sections, or edges rolling toward the drum.
Safety first
Unplug the dryer before opening the cabinet or handling the belt and drum.
Cabinet edges can be sharp, so wear gloves and move slowly around exposed panels.
If your dryer is gas, avoid disturbing gas burner parts, the gas valve, or the gas line. Stop and call a qualified appliance tech if access requires moving gas components.
Do not run the dryer with panels removed unless the design specifically allows safe testing that way.
Tools you may need
Work gloves — Protects your hands from sharp cabinet edges, old adhesive, and rough drum lips.
Phillips screwdriver — Removes common dryer cabinet and panel screws.
Putty knife — Helps release spring clips on some top panels and scrape old felt and glue without gouging the drum lip.
Needle nose pliers — Use them when a clip, spring, or belt loop is too tight for your fingers. If the belt route no longer matches your photo, stop and reset it before reassembly.
Shop vacuum — Cleans lint and felt dust while the dryer is open. This is a good time to remove debris you can safely reach.
Rag and household cleaner — Cleans the drum lip or bulkhead so the new seal can sit flat instead of riding over old glue ridges.
Step-by-step fix
Step 1: Make sure the felt seal is the problem
Unplug the dryer before touching any panels.
Open the door and inspect the front drum gap with a light. Check the rear seal once the cabinet is open enough to see the back edge.
Look for frayed felt, missing chunks, scorch marks, flattened felt, loose glue, black dust, or clothing marks where fabric has been pinched.
Rotate the drum by hand, watch the front gap, and listen at the seal. A dry scrape at the flange points to the felt; a deep thump under the drum points to a roller or bearing instead.
Check the drum lip for a shiny rub line where the felt should have cushioned it. That line matters more than noise by itself.
Find the full model number before ordering. On many dryers it is around the door opening or inside the door area.
Use that number to confirm front seal, rear seal, adhesive, glide strip, and felt profile. Brand and drum diameter are not enough.
If it works: You found visible felt damage or clear rubbing at the drum edge, and you know whether the front seal, rear seal, or both need replacement.
If it doesn’t: If you look at the felt and it is intact, listen underneath the drum before ordering parts. Inspect the roller, bearing, idler pulley, blower wheel, belt, and glides. A felt seal will not cure a bad roller thump.
Stop if:
You see burned wiring, a damaged drum, or a cracked front or rear bulkhead.
The drum is badly out of round or has worn through metal at the seal surface.
Step 2: Open the dryer and remove the drum
Pull the dryer out enough to work comfortably and disconnect the vent if needed.
Remove the top, front, or access panels as your dryer design allows. Watch for spring clips in narrow slots and fasteners hidden near the door opening.
Take clear photos of the belt path, idler pulley, drum position, door switch wiring, and every clip before removing them.
Label or group screws by panel. Dryer cabinet fasteners can look alike but use different lengths.
Release belt tension from the idler pulley and slip the belt off the motor pulley.
Use the belt as a handle to lift and slide the drum out of the cabinet.
Support the rear of the drum as it comes out so the drum flange does not gouge the cabinet, bend the seal channel, or pull wiring. Check the front gap and rear gap before the drum clears the cabinet.
If it works: The drum is out and you can clearly reach the old felt seal and its mounting surface.
If it doesn’t: If the drum will not come out, do not pry harder. Check again for hidden screws, harness clips, front bulkhead tabs, or a belt still under tension.
Stop if:
The cabinet frame is bent enough that the drum cannot be removed cleanly.
On a gas dryer, stop if reaching the drum requires disconnecting or moving gas burner parts, the gas valve, or the gas line. Call a qualified appliance tech for that access.
You find a broken support roller shaft, damaged glide mount, or other major internal damage that also needs repair.
Step 3: Remove the old felt seal and clean the surface
Note exactly where the old seal sits, where the seam lands, and which direction the felt lip or glide surface faces. Measure or mark the gap from the drum edge if the channel is wide.
Peel the old felt seal away from the drum or bulkhead, depending on where your dryer uses it.
Scrape off leftover adhesive, fuzz, and loose material with a putty knife. Keep the blade low so it does not dig into the drum lip or bulkhead.
Run a fingertip over the mounting flange and seal channel. The new felt should sit on clean metal, not on old glue ridges.
Vacuum lint from the cabinet, motor area, blower area you can safely reach, and around the seal track, slots, and lower cabinet ledge.
Wipe the mounting surface clean and dry. Leave no grit, oil, lint, loose rust, or raised adhesive under the new felt.
Lay one section in the clean channel without glue. If it will not sit flat, remove more of the old adhesive before continuing.
If it works: The old seal is fully removed and the mounting surface is clean, smooth, and dry.
If it doesn’t: If adhesive residue is still thick or uneven, keep cleaning. A new felt seal installed over old glue lumps will ride high, rub, and fail early.
Stop if:
The mounting lip is rusted through, cracked, or bent enough that the new seal will not seat securely.
Step 4: Install the matching dryer drum felt seal
Lay the new seal in place before opening the adhesive. Check its length, thickness, shape, smooth glide surface, seam position, and whether it belongs at the front or rear.
For Samsung, Haier, GE, LG, Whirlpool, and similar brand searches, trust the model lookup over the product photo. Felt shape, glide strip, and adhesive rules can change by model series.
Position the new felt seal in the same location and orientation as the original.
If your seal uses adhesive, use only the type and amount listed in the seal instructions. Keep glue off the glide surface and drum path.
Work in small sections so the felt does not twist, bunch up, or stretch unevenly. If it starts walking out of place, stop and reset it before the glue skins over.
Check the seam, then compare the felt height around the full circle. The seam should sit flat, the felt should not stretch thin in one area, and no section should hang farther into the drum path. One raised spot is enough to make the drum scrape again.
Give the adhesive the full set time listed in the seal instructions before putting the drum back.
If it works: The new felt seal is seated evenly all the way around with no gaps, twists, loose sections, or reversed felt.
If it doesn’t: If the seal lifts, twists, or shifts during the dry fit or early glue set, remove it before the adhesive hardens. Clean the surface again and reinstall it evenly. Do not hide a lump under the drum; it will usually announce itself on the first test run.
Stop if:
The replacement seal is clearly the wrong diameter, thickness, profile, or front-versus-rear style for your dryer.
Step 5: Reinstall the drum and reassemble the dryer
Set the drum back into the cabinet slowly. Watch the new felt as the drum flange passes it so the seal does not fold under.
Route the belt around the drum in its original wear path. Reconnect it to the motor pulley and idler pulley from your photo.
Rotate the drum by hand several full turns before the panels go back on. Watch the front gap, rear gap, and felt seam as the drum settles into the new seal.
Watch and feel for binding, scraping, belt misrouting, or a section of felt that rolls inward.
If resistance changes sharply once per turn, reopen the dryer before adding clothes. The drum may be pinching the new seal or riding outside the channel.
Recheck that the drum sits centered and the felt remains flush around the full circle.
Reinstall the front, top, and access panels, then reconnect the vent and check that the exhaust hose is not crushed against the wall.
If it works: The dryer is back together and the drum turns by hand with light, even resistance and no hard scrape at the seal.
If it doesn’t: If the drum binds or scrapes, reopen the dryer and check belt routing, drum seating, and whether the felt folded during reassembly. Do not hope it will wear in.
Stop if:
The drum will not turn freely by hand after correcting the belt path and drum position.
Step 6: Test the repair under real use
Reconnect the vent, then plug the dryer back in. Run it empty on air or low heat for a few minutes first.
Listen for scraping, grinding, or rubbing as the drum comes up to speed.
Check for a hot adhesive smell, smoke, or a new rub mark at the drum edge. Stop the test if any of those show up.
Dry a small load of towels and confirm items are not catching at the drum edge. Save delicate clothes for later.
Recheck the door opening, drum gap, and felt seam after the test cycle.
If it works: The dryer runs smoothly, the scraping is gone or clearly reduced, and clothes move through the cycle without catching at the drum edge.
If it doesn’t: If noise remains, inspect the drum rollers, idler pulley, glides, and blower area for a second worn part. A dryer can have a bad felt seal and a noisy roller at the same time.
Stop if:
You smell strong burning, see smoke, or hear metal-on-metal contact during the test.
Verify the repair
The drum rotates by hand several full turns without a hard scrape at the front or rear edge.
The new felt seal stays seated, flat, and does not roll, bunch, or peel during operation.
The dryer runs with less scraping or grinding noise than before the repair.
Clothes no longer catch between the drum and the front or rear edge.
There is no burning smell, hot rub mark, or fresh felt dust after the test cycle.
FAQ
What does a bad dryer drum felt seal look like?
It often looks frayed, flattened, scorched, torn, or partly missing. Open the door and check the drum edge with a light; dark rub marks, felt dust, or pinched clothing marks point toward the seal.
Can a worn felt seal cause grinding or scraping noise?
Yes. When the seal wears down, the drum can rub where it should be cushioned and guided. Turn the drum by hand and listen at the edge; a dry scrape points toward the seal, while a heavy thump usually points to a roller.
Why is the dryer still noisy after I replaced the felt seal?
The felt seal may not be the only worn item. Drum rollers, glides, the idler pulley, or a damaged blower wheel can also cause noise and may need inspection.
How do I replace a felt seal on a dryer without ordering the wrong one?
Start with the model number and the failed seal location. Front and rear seals can be different, and brand names such as Samsung, Haier, Whirlpool, GE, or LG are not enough. Compare the old seal profile, glide surface, seam position, adhesive requirement, and fit listing before the drum goes back in. While the dryer is open, inspect the rollers too; replace them only if they are flat-spotted, loose, noisy, or leaving black dust.
Sources and reference notes
Use the exact model's service literature. Seal location, adhesive, and cabinet access vary by dryer.